APM Status LEDs using a ULN2803 Darlington Transistor Array

Successful Evening Flying

Successful Evening Flying

As purchased, my QuadCopter/UAV came with strips of LEDs wrapping each of the motor arms wired directly to the power distribution board. When I plug the battery into the board, all of the lights come on. This is good for recognizing the orientation of the UAV but does nothing for recognizing the status of the control board.

The control board I am using is an ArduPilot Mega 2.5 including the GPS and Ground Station Telemetry. I often refer to it as the APM. The APM has several LEDs that blink to indicate various status information, which is useful if you can remember what they mean, but they are individual LEDs and hard to see from any distance. I have installed my APM on the interior of my UAV, which makes the LEDs only visible from certain angles.

I decided that I wanted the primary lights to be useful as status indicators.

Researching the topic I came up with two approaches. One is to use a Darlington Transistor Array driven directly from signal pins in the APM to control LEDs running at higher voltage and amperage than provided directly from the APM. The other is to have a device spliced into the serial telemetry link that interprets the messages being sent to the ground station, controlling and powering the LEDs appropriately.

An example of the direct driven version is shown on the Arducopter website. It also links to a board that is available from JDrones that can be used for the second version.  The JDrones board requires further hardware to be able to properly splice into the serial link. The JDrones hardware looks nice, and I may still go and buy it, but I wanted to try the direct driven version first. Part of my reason was cost, and part of my reason was wanting more experience with the DIY process as opposed to the Off-the-Shelf process. The JDrones solution would cost ~$20 for the first item and ~$10 for the second, while the ULN2803 chips themselves cost under 75¢. None of that includes the wiring or time involved, but most of this is related to the fun of learning so my decision seemed like a good plan.

The most useful post related to my decision was on the DIYDrones site. It’s over two years old but still relevant. This post on configuring the APM firmware was also useful.

Turnigy Waterproof LED Packaging

Turnigy Waterproof LED Packaging

Because I had banged up some of the original LEDs I also am replacing the strips with new LEDs that have waterproof protection and should provide slightly more impact resistance. Before working on this project I had priced individual LEDs and they always seem to be priced so that they cost close to $1 per LED. These LED strips sold at hobby supply stores are designed to be powered simply by applying 12 volts. They are designed to be cut at specific locations between each three LEDs. The hobby store I got them from sells them in 1 meter lenghts, providing 60 LEDs. The 1 meter strip is rated at 400mA at 12 volts, so that should work out to 20mA per segment.
My original lighting used 7 segments to wrap each arm. If the power requirements are the same it would have drawn 140mA per arm, or a total of 560mA for the 4 arms. By reducing to 6 segments per arm, I should reduce the power requirement for lighting below 500mA. This might be important because the ULN2803 lists its capacity as 500mA per channel.

Radio Shack DIP Project Board

Radio Shack DIP Project Board

Before starting my soldering I came across a radio shack board designed to take a DIP package and give multiple conductivity pads per pin. I decided that it was absolutely the correct tool for my first project. After getting a successful system, I could reproduce the system in a much smaller package, but this would be a good first direction. I found an inexpensive package of short servo extensions online and decided that I’d rather use those to connect the LEDs than build my own connectors or solder the LEDs directly to my project. This lets me change the device driving my LEDs in the future without resoldering everything.

My soldering skills are still not what I’d like, and I spent much time soldering the wires to the board. The finished product is not as nice as what I was envisioning before I started the process.

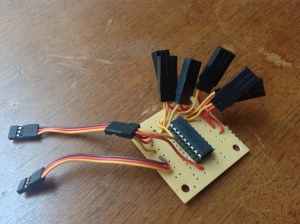
ULN2803 Mounted Radio Shack Board with wires soldered in place.

ULN2803 Mounted Radio Shack Board with wires soldered in place.

Back of Radio Shack Board showing the soldering.

Back of Radio Shack Board showing the soldering.

The two long leads going to the left are designed to connect to the signal pins 4 through 9 of the APM. The short lead on the left is supposed to connect to 12 volt power. The six short leads on the right can connect to six different 12 volt LED strips or indicators.

The board I used is designed to be able to hold a 20 pin DIP package, but the ULN2803 is only 18 pins. I used the pads for the top two pins to create a common 12 volt positive power pad to solder all of the LED leads together.

This project is not yet functional, and I’m not sure why.

I tested that the LEDS and power were properly connected by using a jumper wire and making content on the ULN2803 to the pins down the right side of the package and the ground pin on the package lower left. I was able to light up the LEDs individually using that method.

It has been suggested that I need to run the ground wire back to the APM ground plane for it to be able to send signals on it’s signalling channel. This makes sense to me, but I’m hesitant to do it because I don’t want to burn out my APM while experimenting with the rest of the electronics.

The first links building this style project were using a ULN2003 while I’m using a ULN2803. I’ve not figured out the difference between the two chips, but it’s possibly related to my problem.

Any suggestions as two what I’ve done wrong are welcome.

UAV and GPS Dependency

Last weekend I was attempting to have my UAV fly a couple of programmed missions so that I could get a straightforward video of what I was doing.

My mission was simple, and I’d run similar missions before so I expected this to produce a nice video. I would take off, fly a circle with a 50 meter radius at 100 meters altitude, move to another location and fly a second circle at 30 meters altitude, then return to launch. Here’s what it looked like in Mission Planner.

Things look good in Mission Planner

Things look good in Mission Planner

Things started well, but went haywire a few minutes into the flight. There were a few bobbles as is descended from the first circle altitude to the second circle, but I was hoping to let the on-board computer maintain or recover control.


The flight starts around 1:40 on the video, and things generally look good until around 4:50. At that point the UAV starts making some significant attitude adjustments. Around 5:10 it seems to have recovered and making the adjustments to go around the second circle. (At 5:35 the camera is pointed back towards the launch point and you can see two small dots on the ground. That’s the two of us monitoring the flight with the transmitter and a pair of binoculars.) It finishes the second circle around 6:30, at which it should have initiated the RTL, Return to Launch, phase of its mission. Unfortunately I do not currently have the UAV set to face forward during the RTL phase, and so it does not rotate towards the launch point, just travels in that direction. You can see it tilt slightly back, moving in the correct direction, for the first ten seconds until 6:42, but then it starts making huge adjustments to its direction, running the motors at full throttle. At 8:08 it hit the trees.
After the flight I downloaded the log file from the UAV and tried to analyse what went wrong. I was able to produce this picture using Google Earth from the resulting KMZ file.

Mission Gone Bad

Mission Gone Bad

I’m still not sure exactly what went wrong. I believe that the copter lost resolution on the GPS, simply based on the fact that the track never shows it going to the trees, and I don’t remember it doing as much spiraling as the KMZ would indicate. The KMZ file may be available at my home server but right now it does not appear to want to serve kmz or kml files.  The descent from the first circle towards the second circle appears smooth until it no longer needed to travel horizontally, At the point when it needed to only reduce altitude it seemed to circle and appeared to be much more unstable. Perhaps making sure that all programmed descents had much more vertical motion would produce smoother flights in general.

A few valuable lessons that I learned, in no particular order.

  • Stick to flying where there are no people nearby. Even at an RC airplane field with a few experienced people around, this could cause significant injury to humans or damage to property. When the copter was coming in fast towards the landing area, and obviously going to overshoot into the trees, completely losing the copter in the trees is much better than causing any injury or damage to someone else.
  • Be quicker to abort an automated mission and take manual control. I had handed my transmitter to a more experienced pilot while I monitored the automatic mission via binoculars. Several times he asked if he should take control of the unit and I told him that I wanted to see if the unit would recover itself. The early bobbles during the descent from the first circle to the second it recovered, but the RTL path was completely wrong.
  • Give the UAV plenty of time to achieve a reliable GPS lock before arming the motors and taking off.  According to what I’ve read, the launch location used for the RTL function is stored when you arm the motors, not when you actually leave the ground, or power on the entire copter. Landing and disarming the motors in a second location would reset the launch location when you re-arm them.

An interesting thing I’ve noticed by following the drone chatter on the hype meter is how much of a clash this is causing between the computer and robotics crowd and the traditional RC airplane crowd.

The traditional RC airplane hobbyists have been around for over 50 years, and have slowly been integrating new technology such has digital radios, electric motors, and Lithium Polymer batteries into use as the technology as become available. Historical fixed wing aircraft and analog transmitters required large open spaces for both safety and to make sure that there was no radio interference. Liquid fueled model aircraft produced large amounts of noise, and so added to the reasons of working in large open spaces.

The person coming into the UAV/Drone space often has no background in the RC airplane hobby itself and so has no history of the safety requirements and why they exist. Starting with a quadcopter and its capabilities is completely different from starting with a fixed wing aircraft. VTOL, vertical takeoff and landing, brings a confidence that this can be done in a small space, however misplaced that confidence may be. First person video (FPV) seems a natural extension to most new pilots and the concept of limited bandwidth is completely alien.

There are good organizations such as http://www.modelaircraft.org/ that exist for hobbyists, but the person getting into it from the computer side of things often may not even know about them, and an unattractive web site may cause lack of understanding of the benefits offered.

I would not have gotten into this at all if a friend that I’ve known since we were in 4th grade had not added multi rotor copters to his long standing hobby of RC Airplanes. He was telling me how much was available in the new systems, and showing me first person videos on his screen. The fact that he was using all of these digital systems, but his video was still analog, was what got me interested. I wanted to be able to record the entire flight digitally.

I’ve been extremely lucky so far, not having damaged anything or injured anyone, and not broken more than $30 worth of items on my ‘copter so far, let alone lost it entirely. I’ve still got plenty to learn, as well as learning to be much safer, but I’m enjoying the process so far.

Logitech C920 Angle of View

I realized today that the Logitech C920 webcam produces images covering a different field of vision (FOV) for the same width based on the height. I was expecting the horizontal field to be the same for a given width but it was not.

Using the command ffmpeg -f video4linux2 -list_formats all -i /dev/video0 to retrieve the sizes of video available lists the same set of sizes for h264 and mjpeg. 640×480 160×90 160×120 176×144 320×180 320×240 352×288 432×240 640×360 800×448 800×600 864×480 960×720 1024×576 1280×720 1600×896 1920×1080. In Raw/yuyv422 mode two additional sizes are available. 2304×1296 2304×1536.

I pointed my webcam at the building out my window, giving myself a rough grid pattern to look at and ran it through all of the h.264 sizes, and manually counted the horizontal and vertical blocks visible. 

I expected 640×480 and 640×360 to be the same horizontal FOV but have different vertical FOV. What actually happened in the FOV was that they displayed the same vertical FOV but different horizontal FOV.

I ran through all of the h264 resolutions, and the vertical FOV appeared to shrink slightly when I requested resolutions below 200, but otherwise stayed the same. 

Selecting 2304×1536 produced a slightly larger vertical FOV with the same horizontal FOV as 1920×1080. 2304×1296 seemed to produce the same FOV in both directions as 1920×1080.  Both of these resolutions run at lower frame rates and only in raw mode. I was testing them using ffmpeg transcoding and sending to my windows desktop with the command: ffmpeg -re -f v4l2 -video_size 2304×1536 -framerate 2 -input_format yuyv422 -i /dev/video0 -f mpegts udp://192.168.0.10:8090

The C920 advertises a Diagonal FOV of 78°, but I didn’t find official meaning of that.  I found a nice bit of information at http://therandomlab.blogspot.com/2013/03/logitech-c920-and-c910-fields-of-view.html that describes it as explicitly as being when the camera is running in 16×9 mode. 

I will probably get around to writing a program to more accurately produce the results.  Here’s my manual table:

Resolution Width Height Blocks Floors Width/Height Ratio MegaPixels
160×90  160 90 9 8 1.777778 0.01
160×120  160 120 7 8 1.333333 0.01
176×144  176 144 7 9 1.222222 0.02
320×180  320 180 9 8 1.777778 0.05
320×240  320 240 7 9 1.333333 0.07
352×288  352 288 7 9 1.222222 0.1
432×240  432 240 10 9 1.8 0.1
640×360  640 360 10 9 1.777778 0.23
640×480  640 480 7 9 1.333333 0.3
800×448  800 448 10 9 1.785714 0.35
800×600  800 600 7 9 1.333333 0.48
864×480  864 480 10 9 1.8 0.41
960×720  960 720 7 9 1.333333 0.69
1024×576  1024 576 10 9 1.777778 0.58
1280×720  1280 720 10 9 1.777778 0.92
1600×896  1600 896 10 9 1.785714 1.43
1920×1080 1920 1080 10 9 1.777778 2.07
2304×1296 2304 1296     1.777778 2.98
2304×1536 2304 1536     1.5 3.53
  16 9     1.777778
  4 3     1.333333


WimTiVoServer changes to use FFProbe

WimTiVoServer was originally written using the libraries that FFMPEG is based on to retrieve details about video files. I had downloaded the packages from http://ffmpeg.zeranoe.com/builds/ and used the DLLs for the library calls. In other program I’m building related to FFMPEG I am updating FFMPEG on a regular basis. Maintaining the correct link path any time I came back for a minor adjustment to WimTiVoServer became more of an effort than I wanted to deal with, so I investigated what else was available.

My solution has been to use FFProbe, which is distributed with FFmpeg. I am using the spawning a child process and capturing the standard output. I read the results of my command and put it into a IStream memory stream object, which I then use the IXmlReader object to parse the XML for the items I’m looking for.

The command line I’m using for FFProbe is ffprobe.exe -show_streams -show_format -print_format xml INPUT. An example of the output it produces is:

<?xml version="1.0" encoding="UTF-8"?>
<ffprobe>
    <streams>
        <stream index="0" codec_name="ac3" codec_long_name="ATSC A/52A (AC-3)" codec_type="audio" codec_time_base="1/48000" codec_tag_string="[0][0][0][0]" codec_tag="0x0000" sample_fmt="fltp" sample_rate="48000" channels="6" bits_per_sample="0" dmix_mode="-1" ltrt_cmixlev="-1.000000" ltrt_surmixlev="-1.000000" loro_cmixlev="-1.000000" loro_surmixlev="-1.000000" id="0x27" r_frame_rate="0/0" avg_frame_rate="0/0" time_base="1/10000000" start_pts="22054844" start_time="2.205484" duration_ts="19133694951" duration="1913.369495" bit_rate="384000">
            <disposition default="0" dub="0" original="0" comment="0" lyrics="0" karaoke="0" forced="0" hearing_impaired="0" visual_impaired="0" clean_effects="0" attached_pic="0"/>
        </stream>
        <stream index="1" codec_name="ac3" codec_long_name="ATSC A/52A (AC-3)" codec_type="audio" codec_time_base="1/48000" codec_tag_string="[0][0][0][0]" codec_tag="0x0000" sample_fmt="fltp" sample_rate="48000" channels="2" bits_per_sample="0" dmix_mode="-1" ltrt_cmixlev="-1.000000" ltrt_surmixlev="-1.000000" loro_cmixlev="-1.000000" loro_surmixlev="-1.000000" id="0x28" r_frame_rate="0/0" avg_frame_rate="0/0" time_base="1/10000000" start_pts="23039510" start_time="2.303951" bit_rate="192000">
            <disposition default="0" dub="0" original="0" comment="0" lyrics="0" karaoke="0" forced="0" hearing_impaired="0" visual_impaired="0" clean_effects="0" attached_pic="0"/>
        </stream>
        <stream index="2" codec_name="mpeg2video" codec_long_name="MPEG-2 video" profile="Main" codec_type="video" codec_time_base="1001/120000" codec_tag_string="[0][0][0][0]" codec_tag="0x0000" width="1280" height="720" has_b_frames="1" sample_aspect_ratio="1:1" display_aspect_ratio="16:9" pix_fmt="yuv420p" level="4" timecode="00:00:00:00" id="0x29" r_frame_rate="60000/1001" avg_frame_rate="60000/1001" time_base="1/10000000" start_pts="31875510" start_time="3.187551">
            <disposition default="0" dub="0" original="0" comment="0" lyrics="0" karaoke="0" forced="0" hearing_impaired="0" visual_impaired="0" clean_effects="0" attached_pic="0"/>
        </stream>
        <stream index="3" codec_type="subtitle" codec_time_base="1/10000000" codec_tag_string="[0][0][0][0]" codec_tag="0x0000" id="0x2a" r_frame_rate="0/0" avg_frame_rate="0/0" time_base="1/10000000" start_pts="32209177" start_time="3.220918">
            <disposition default="0" dub="0" original="0" comment="0" lyrics="0" karaoke="0" forced="0" hearing_impaired="0" visual_impaired="0" clean_effects="0" attached_pic="0"/>
        </stream>
        <stream index="4" codec_name="mjpeg" codec_long_name="MJPEG (Motion JPEG)" codec_type="video" codec_time_base="1/90000" codec_tag_string="[0][0][0][0]" codec_tag="0x0000" width="200" height="113" has_b_frames="0" sample_aspect_ratio="1:1" display_aspect_ratio="200:113" pix_fmt="yuvj420p" level="-99" id="0xffffffff" r_frame_rate="90000/1" avg_frame_rate="0/0" time_base="1/90000" start_pts="198494" start_time="2.205489" duration_ts="172203255" duration="1913.369500">
            <disposition default="0" dub="0" original="0" comment="0" lyrics="0" karaoke="0" forced="0" hearing_impaired="0" visual_impaired="0" clean_effects="0" attached_pic="1"/>
            <tag key="title" value="TV Thumbnail"/>
        </stream>
    </streams>

    <format filename="d:\Recorded TV\Archer_FXPHD_2013_02_28_22_00_00.wtv" nb_streams="5" nb_programs="0" format_name="wtv" format_long_name="Windows Television (WTV)" start_time="2.205484" duration="1913.369495" size="1956642816" bit_rate="8180930" probe_score="100">
        <tag key="WM/MediaClassPrimaryID" value="db9830bd-3ab3-4fab-8a371a995f7ff74"/>
        <tag key="WM/MediaClassSecondaryID" value="ba7f258a-62f7-47a9-b21f4651c42a000"/>
        <tag key="Title" value="Archer"/>
        <tag key="WM/SubTitle" value="Live and Let Dine"/>
        <tag key="WM/SubTitleDescription" value="Archer, Lana and Cyril go undercover in celebrity chef Lance Casteau&apos;s hellish kitchen."/>
        <tag key="genre" value="Comedy;General;Series"/>
        <tag key="WM/OriginalReleaseTime" value="0"/>
        <tag key="language" value="en-us"/>
        <tag key="WM/MediaCredits" value="H. Jon Benjamin/Jessica Walter/Aisha Tyler/George Coe/Chris Parnell/Judy Greer;;;Anthony Bourdain"/>
        <tag key="service_provider" value="FXPHD"/>
        <tag key="service_name" value="FX HD (Pacific)"/>
        <tag key="WM/MediaNetworkAffiliation" value="Satellite"/>
        <tag key="WM/MediaOriginalChannel" value="728"/>
        <tag key="WM/MediaOriginalChannelSubNumber" value="0"/>
        <tag key="WM/MediaOriginalBroadcastDateTime" value="2013-02-28T08:00:00Z"/>
        <tag key="WM/MediaOriginalRunTime" value="19144791872"/>
        <tag key="WM/MediaIsStereo" value="false"/>
        <tag key="WM/MediaIsRepeat" value="false"/>
        <tag key="WM/MediaIsLive" value="false"/>
        <tag key="WM/MediaIsTape" value="false"/>
        <tag key="WM/MediaIsDelay" value="false"/>
        <tag key="WM/MediaIsSubtitled" value="false"/>
        <tag key="WM/MediaIsMovie" value="false"/>
        <tag key="WM/MediaIsPremiere" value="false"/>
        <tag key="WM/MediaIsFinale" value="false"/>
        <tag key="WM/MediaIsSAP" value="false"/>
        <tag key="WM/MediaIsSport" value="false"/>
        <tag key="WM/Provider" value="MediaCenterDefault"/>
        <tag key="WM/VideoClosedCaptioning" value="false"/>
        <tag key="WM/WMRVEncodeTime" value="2013-03-01 06:00:05"/>
        <tag key="WM/WMRVSeriesUID" value="!MCSeries!225842780"/>
        <tag key="WM/WMRVServiceID" value="!MCService!188913961"/>
        <tag key="WM/WMRVProgramID" value="!MCProgram!285145704"/>
        <tag key="WM/WMRVRequestID" value="0"/>
        <tag key="WM/WMRVScheduleItemID" value="0"/>
        <tag key="WM/WMRVQuality" value="0"/>
        <tag key="WM/WMRVOriginalSoftPrePadding" value="300"/>
        <tag key="WM/WMRVOriginalSoftPostPadding" value="120"/>
        <tag key="WM/WMRVHardPrePadding" value="-300"/>
        <tag key="WM/WMRVHardPostPadding" value="0"/>
        <tag key="WM/WMRVATSCContent" value="true"/>
        <tag key="WM/WMRVDTVContent" value="true"/>
        <tag key="WM/WMRVHDContent" value="true"/>
        <tag key="Duration" value="19151788198"/>
        <tag key="WM/WMRVEndTime" value="2013-03-01 06:32:00"/>
        <tag key="WM/WMRVBitrate" value="8.173201"/>
        <tag key="WM/WMRVKeepUntil" value="-1"/>
        <tag key="WM/WMRVActualSoftPrePadding" value="294"/>
        <tag key="WM/WMRVActualSoftPostPadding" value="120"/>
        <tag key="WM/WMRVContentProtected" value="true"/>
        <tag key="WM/WMRVContentProtectedPercent" value="99"/>
        <tag key="WM/WMRVExpirationSpan" value="9223372036854775807"/>
        <tag key="WM/WMRVInBandRatingSystem" value="255"/>
        <tag key="WM/WMRVInBandRatingLevel" value="255"/>
        <tag key="WM/WMRVInBandRatingAttributes" value="0"/>
        <tag key="WM/WMRVWatched" value="false"/>
        <tag key="WM/MediaThumbWidth" value="352"/>
        <tag key="WM/MediaThumbHeight" value="198"/>
        <tag key="WM/MediaThumbStride" value="1056"/>
        <tag key="WM/MediaThumbRet" value="0"/>
        <tag key="WM/MediaThumbRatingSystem" value="9"/>
        <tag key="WM/MediaThumbRatingLevel" value="17"/>
        <tag key="WM/MediaThumbRatingAttributes" value="0"/>
        <tag key="WM/MediaThumbAspectRatioX" value="16"/>
        <tag key="WM/MediaThumbAspectRatioY" value="9"/>
        <tag key="WM/MediaThumbTimeStamp" value="4647772712253334203"/>
    </format>
</ffprobe>

I am parsing the XML and keeping track of only the first video stream details and the first audio stream details, and then looking for some specific items in the metadata tags. I store the information and return it to the TiVo as information when it’s requesting a list of what programs are available to transfer and then when I transfer the file itself.

An interesting side effect of moving to using XML from using the libraries is that the XML created by FFProbe handles extended characters that are not in the ASCII character set. Because I’m using the XML Parser that works with Unicode by default, it takes care of the characters properly. When I was using the libraries, I was looping on AVDictionaryEntry values and doing comparisons with char values.

Here is the code that I’m currently using. It’s not the prettiest code but it gets the job done and runs quickly enough.

void cTiVoFile::PopulateFromFFProbe(void)
{
	static const CString csFFProbePath(FindEXEFromPath(_T("ffprobe.exe")));
	if (!csFFProbePath.IsEmpty())
	{
		// Set the bInheritHandle flag so pipe handles are inherited. 
		SECURITY_ATTRIBUTES saAttr;  
		saAttr.nLength = sizeof(SECURITY_ATTRIBUTES); 
		saAttr.bInheritHandle = TRUE; 
		saAttr.lpSecurityDescriptor = NULL; 

		// Create a pipe for the child process's STDOUT. 
		HANDLE g_hChildStd_OUT_Rd = NULL;
		HANDLE g_hChildStd_OUT_Wr = NULL;
		if ( ! CreatePipe(&g_hChildStd_OUT_Rd, &g_hChildStd_OUT_Wr, &saAttr, 0x800000) ) 
			std::cout << "[" << getTimeISO8601() << "] "  << __FUNCTION__ << "\t ERROR: StdoutRd CreatePipe" << endl;
		else
		{
			// Ensure the read handle to the pipe for STDOUT is not inherited.
			if ( ! SetHandleInformation(g_hChildStd_OUT_Rd, HANDLE_FLAG_INHERIT, 0) )
				std::cout << "[" << getTimeISO8601() << "] "  << __FUNCTION__ << "\t ERROR: Stdout SetHandleInformation" << endl;
			else
			{
				// Create a child process that uses the previously created pipes for STDIN and STDOUT.
				// Set up members of the PROCESS_INFORMATION structure.  
				PROCESS_INFORMATION piProcInfo; 
				ZeroMemory( &piProcInfo, sizeof(PROCESS_INFORMATION) );
 
				// Set up members of the STARTUPINFO structure. 
				// This structure specifies the STDIN and STDOUT handles for redirection.
				STARTUPINFO siStartInfo;
				ZeroMemory( &siStartInfo, sizeof(STARTUPINFO) );
				siStartInfo.cb = sizeof(STARTUPINFO); 
				siStartInfo.hStdError = GetStdHandle(STD_ERROR_HANDLE);
				siStartInfo.hStdInput = GetStdHandle(STD_INPUT_HANDLE);
				siStartInfo.hStdOutput = g_hChildStd_OUT_Wr;
				siStartInfo.dwFlags |= STARTF_USESTDHANDLES;
 
				CString csCommandLine(QuoteFileName(csFFProbePath));
				csCommandLine.Append(_T(" -show_streams -show_format -print_format xml "));
				csCommandLine.Append(QuoteFileName(m_csPathName));

				TRACE(_T("CreateProcess: %s\n"), csCommandLine.GetString());
				// Create the child process.
				if (CreateProcess(NULL, 
					(LPTSTR) csCommandLine.GetString(),     // command line 
					NULL,          // process security attributes 
					NULL,          // primary thread security attributes 
					TRUE,          // handles are inherited 
					0,             // creation flags 
					NULL,          // use parent's environment 
					NULL,          // use parent's current directory 
					&siStartInfo,  // STARTUPINFO pointer 
					&piProcInfo))  // receives PROCESS_INFORMATION 
				{
					CloseHandle(g_hChildStd_OUT_Wr);	// If I don't do this, then the parent will never exit!
					CComPtr<IStream> spMemoryStreamOne(::SHCreateMemStream(NULL, 0));
					if (spMemoryStreamOne != NULL)
					{
						const int RAWDataBuffSize = 0x1000;	// 0x1000 is 4k
						char * RAWDataBuff = new char[RAWDataBuffSize];
						for (;;)
						{
							DWORD dwRead = 0;
							BOOL bSuccess = ReadFile(g_hChildStd_OUT_Rd, RAWDataBuff, RAWDataBuffSize, &dwRead, NULL);
							if( (!bSuccess) || (dwRead == 0)) break;
							ULONG cbWritten;
							spMemoryStreamOne->Write(RAWDataBuff, dwRead, &cbWritten);
						} 
						delete[] RAWDataBuff;
						// reposition back to beginning of stream
						LARGE_INTEGER position;
						position.QuadPart = 0;
						spMemoryStreamOne->Seek(position, STREAM_SEEK_SET, NULL);
						HRESULT hr = S_OK;
						CComPtr<IXmlReader> pReader; 
						if (SUCCEEDED(hr = CreateXmlReader(__uuidof(IXmlReader), (void**) &pReader, NULL))) 
						{
							if (SUCCEEDED(hr = pReader->SetProperty(XmlReaderProperty_DtdProcessing, DtdProcessing_Prohibit))) 
							{
								if (SUCCEEDED(hr = pReader->SetInput(spMemoryStreamOne))) 
								{
									int indentlevel = 0;
									XmlNodeType nodeType; 
									const WCHAR* pwszLocalName;
									const WCHAR* pwszValue;
									CString csLocalName;
									bool bIsFormat = false;
									bool bVideoStreamInfoNeeded = true;
									bool bAudioStreamInfoNeeded = true;

									//read until there are no more nodes 
									while (S_OK == (hr = pReader->Read(&nodeType))) 
									{
										if (nodeType == XmlNodeType_Element)
										{
											if (SUCCEEDED(hr = pReader->GetLocalName(&pwszLocalName, NULL)))
											{
												csLocalName = CString(pwszLocalName);
												if ((bVideoStreamInfoNeeded || bAudioStreamInfoNeeded) && !csLocalName.Compare(_T("stream")))
												{
													CString cs_codec_name;
													CString cs_codec_type;
													CString cs_codec_time_base;
													CString cs_width;
													CString cs_height;
													CString cs_duration;
													while (S_OK == pReader->MoveToNextAttribute())
													{
														if (SUCCEEDED(hr = pReader->GetLocalName(&pwszLocalName, NULL)))
															if (SUCCEEDED(hr = pReader->GetValue(&pwszValue, NULL)))
														{
															csLocalName = CString(pwszLocalName);
															if (!csLocalName.Compare(_T("codec_name")))
																cs_codec_name = CString(pwszValue);
															else if (!csLocalName.Compare(_T("codec_type")))
																cs_codec_type = CString(pwszValue);
															else if (!csLocalName.Compare(_T("codec_time_base")))
																cs_codec_time_base = CString(pwszValue);
															else if (!csLocalName.Compare(_T("width")))
																cs_width = CString(pwszValue);
															else if (!csLocalName.Compare(_T("height")))
																cs_height = CString(pwszValue);
															else if (!csLocalName.Compare(_T("duration")))
																cs_duration = CString(pwszValue);
														}
													}
													if (!cs_codec_type.Compare(_T("video")))
													{
														bVideoStreamInfoNeeded = false;
														if (!cs_codec_name.Compare(_T("mpeg2video")))
															m_VideoCompatible = true;
														m_SourceFormat = cs_codec_type + CString(_T("/")) + cs_codec_name;
														int width = 0;
														std::wstringstream ss;
														ss << cs_width.GetString();
														ss >> width;
														if (width >= 1280)
															m_VideoHighDefinition = true;
														double duration = 0;
														ss = std::wstringstream();
														ss << cs_duration.GetString();
														ss >> duration;
																												m_Duration = duration * 1000 + 5;													}
													else if (!cs_codec_type.Compare(_T("audio")))
													{
														bAudioStreamInfoNeeded = false;
														if (!cs_codec_name.Compare(_T("ac3")))
															m_AudioCompatible = true;
													}	
												}
												else if (!csLocalName.Compare(_T("format")))
												{
													bIsFormat = true;
													const CString ccs_duration(_T("duration"));
													while (S_OK == pReader->MoveToNextAttribute())
													{
														if (SUCCEEDED(hr = pReader->GetLocalName(&pwszLocalName, NULL)))
															if (SUCCEEDED(hr = pReader->GetValue(&pwszValue, NULL)))
														{
															if (!ccs_duration.Compare(pwszLocalName))
															{
																double duration = 0;
																std::wstringstream ss;
																ss << pwszValue;
																ss >> duration;
																m_Duration = duration * 1000 + 5;
															}
														}
													}
												}
												// Here's where I need to dig deeper.
												else if (bIsFormat && (!csLocalName.Compare(_T("tag"))))
												{
													CString csAttributeKey;
													CString csAttributeValue;
													while (S_OK == pReader->MoveToNextAttribute())
													{
														if (SUCCEEDED(hr = pReader->GetLocalName(&pwszLocalName, NULL)))
															if (SUCCEEDED(hr = pReader->GetValue(&pwszValue, NULL)))
														{
															if (!CString(_T("key")).Compare(pwszLocalName))
																csAttributeKey = CString(pwszValue);
															else if (!CString(_T("value")).Compare(pwszLocalName))
																csAttributeValue = CString(pwszValue);
														}
													}
													if (!csAttributeKey.CompareNoCase(_T("title")))
														m_Title = csAttributeValue;
													else if (!csAttributeKey.CompareNoCase(_T("episode_id")))
														m_EpisodeTitle = csAttributeValue;
													else if (!csAttributeKey.CompareNoCase(_T("description")))
														m_Description = csAttributeValue;
													else if (!csAttributeKey.CompareNoCase(_T("WM/SubTitle")))
														m_EpisodeTitle = csAttributeValue;
													else if (!csAttributeKey.CompareNoCase(_T("WM/SubTitleDescription")))
														m_Description = csAttributeValue;
													else if (!csAttributeKey.CompareNoCase(_T("genre")))
														m_vProgramGenre = csAttributeValue;
													else if (!csAttributeKey.CompareNoCase(_T("service_provider")))
														m_SourceStation = csAttributeValue;
													else if (!csAttributeKey.CompareNoCase(_T("WM/MediaOriginalChannel")))
														m_SourceChannel = csAttributeValue;
													else if (!csAttributeKey.CompareNoCase(_T("WM/MediaCredits")))
													{
														m_vActor = csAttributeValue;
														while (0 < m_vActor.Replace(_T(";;"),_T(";")));
														while (0 < m_vActor.Replace(_T("//"),_T("/")));
													}
													else if (!csAttributeKey.CompareNoCase(_T("WM/WMRVEncodeTime")))
													{
														CTime OriginalBroadcastDate = ISO8601totime(std::string(CStringA(csAttributeValue).GetString()));
														if (OriginalBroadcastDate > 0)
															m_CaptureDate = OriginalBroadcastDate;
													}
													else if (!csAttributeKey.CompareNoCase(_T("WM/MediaOriginalBroadcastDateTime")))
													{
														CTime OriginalBroadcastDate = ISO8601totime(std::string(CStringA(csAttributeValue).GetString()));
														if (OriginalBroadcastDate > 0)
															m_CaptureDate = OriginalBroadcastDate;
													}
																										m_Description.Trim();
												}
											}
										}
										else if (nodeType == XmlNodeType_EndElement)
										{
											if (SUCCEEDED(hr = pReader->GetLocalName(&pwszLocalName, NULL)))
												if (!CString(pwszLocalName).Compare(_T("format")))
													bIsFormat = false;
										}
									}
								}
							}
						}
					}
					// Close handles to the child process and its primary thread.
					// Some applications might keep these handles to monitor the status
					// of the child process, for example. 
					CloseHandle(piProcInfo.hProcess);
					CloseHandle(piProcInfo.hThread);
				}
			}
			CloseHandle(g_hChildStd_OUT_Rd);
		}
	}
}

BeagleBoneBlack 5.8GHz WiFi Reliability

After upgrading the operating system, providing more power via a powered USB Hub, and better understanding the startup scripts, I seem to have a reliable WiFi link from my BBB.

I still have occasional problems at boot time with the device not connecting to my WiFi network. I’ve got an FTDI USB-SerialTTL console cable that I can connect to the device and examine the status. Most of the time when I’ve not been able to reach the device over the network and I do this, running the lsusb command produces results showing nothing connected beyond the internal USB devices.

root@beaglebone:~# lsusb
Bus 001 Device 001: ID 1d6b:0002 Linux Foundation 2.0 root hub
Bus 002 Device 001: ID 1d6b:0002 Linux Foundation 2.0 root hub

If I disconnect the USB hub, remove and reapply it’s power, and reconnect the USB hub, sometimes it will cause the BBB to recognize the USB devices, but often it requires removing all power, disconnecting the hub, and reconnecting everything.

USB Power is the first issue in getting things to work. I only have the verbose reports from the lsusb command to go on for deciding how much power I need. The spec sheet for the BBB reports that it can only supply 500 mA on it’s USB port, and even then only if it’s powered by an external power adapter via the barrel jack. My WiFi adapter reports 450 mA. My camera reports 500mA. The hub in self powered operation reports 100mA. The power adapter that came with my hub reports it’s output as 2.1A, which would indicate that it should be able to provide the standard 500mA to each of it’s 4 ports if it’s running on external power.

root@beaglebone:~# lsusb ; lsusb --verbose | grep MaxPower
Bus 001 Device 002: ID 0409:005a NEC Corp. HighSpeed Hub
Bus 001 Device 001: ID 1d6b:0002 Linux Foundation 2.0 root hub
Bus 002 Device 001: ID 1d6b:0002 Linux Foundation 2.0 root hub
Bus 001 Device 003: ID 13b1:002f Linksys AE1000 v1 802.11n [Ralink RT3572]
Bus 001 Device 004: ID 046d:082d Logitech, Inc.
    MaxPower              100mA
    MaxPower                0mA
    MaxPower                0mA
    MaxPower              450mA
    MaxPower              500mA

I’m running a system that I started by flashing my eMMC with the 9/4/2013 image I downloaded from http://circuitco.com/support/index.php?title=Updating_The_Software#Procedure

The dmesg command reports the kernel as “Linux version 3.8.13 (koen@rrMBP) (gcc version 4.7.3 20130205 (prerelease) (Linaro GCC 4.7-2013.02-01) ) #1 SMP Wed Sep 4 09:09:32 CEST 2013”

I am running with a 32GB micro sd card installed, and partitioned into two volumes. In the root of the FAT volume I’ve got a uEnv.txt file that continues the boot process to the eMMC and it also issues the kernel command to disable the internal HDMI cape on the BBB. Since I’m only running this device over the network, I have decided it is more efficient to disable the HDMI entirely. I don’t think that the HDMI changes affect my WiFi, but I’ve not investigated it either.

root@beaglebone:~# fdisk -l /dev/mmcblk0 /dev/mmcblk1

Disk /dev/mmcblk0: 31.9 GB, 31914983424 bytes, 62333952 sectors
Units = sectors of 1 * 512 = 512 bytes
Sector size (logical/physical): 512 bytes / 512 bytes
I/O size (minimum/optimal): 512 bytes / 512 bytes
Disk label type: dos
Disk identifier: 0x00000000

        Device Boot      Start         End      Blocks   Id  System
/dev/mmcblk0p1            2048    41945087    20971520    c  W95 FAT32 (LBA)
/dev/mmcblk0p2        41945088    62333951    10194432   83  Linux

Disk /dev/mmcblk1: 1920 MB, 1920991232 bytes, 3751936 sectors
Units = sectors of 1 * 512 = 512 bytes
Sector size (logical/physical): 512 bytes / 512 bytes
I/O size (minimum/optimal): 512 bytes / 512 bytes
Disk label type: dos
Disk identifier: 0x00000000

        Device Boot      Start         End      Blocks   Id  System
/dev/mmcblk1p1   *          63      144584       72261    c  W95 FAT32 (LBA)
/dev/mmcblk1p2          144585     3743144     1799280   83  Linux

root@beaglebone:~# cat /media/BONEBOOT/uEnv.txt
mmcdev=1
bootpart=1:2
mmcroot=/dev/mmcblk1p2
optargs=quiet capemgr.disable_partno=BB-BONELT-HDMI,BB-BONELT-HDMIN

root@beaglebone:~# cat /etc/fstab
rootfs               /                    auto       defaults              1  1
proc                 /proc                proc       defaults              0  0
devpts               /dev/pts             devpts     mode=0620,gid=5       0  0
tmpfs                /tmp                 tmpfs      defaults              0  0
/dev/mmcblk0p2       /home                auto       defaults              0  2
/dev/mmcblk0p1       /media/BONEBOOT      auto       defaults              0  2
/dev/sda1            /media/PNY           auto       noauto                0  2
/dev/mmcblk1p1       /media/BEAGLEBONE    auto       ro                    0  2

I have created a file /var/lib/connman/wifi.config that has two sections, one for each of the wifi networks that I regularly connect to. The first is my primary network, and it seems to be stable connecting. The second is a network I occasionally power up, but I’ve not spent much time testing it. The good thing is that the credentials are in one place, and it’s supposed to chose the first network in the list that is found.

root@beaglebone:~# cat /var/lib/connman/wifi.config
[service_WimsWorld-5G]
Type = wifi
Name = WimsWorld-5G
Security = wpa2-psk
Passphrase = MyPasswordInPlainText

[service_WimsWorld-UAV]
Type = wifi
Name = WimsWorld-UAV
Security = wpa2-psk
Passphrase = MyPasswordInPlainText

I created /etc/udev/rules.d/70-wifi-powersave.rules following the information in https://wiki.archlinux.org/index.php/Power_saving#Network_interfaces , paying explicit attention to the fact that naming the file matters.

In this case, the name of the configuration file is important. Due to the introduction of persistent device names via 80-net-name-slot.rules in systemd v197, it is important that the network powersave rules are named lexicographically before 80-net-name-slot.rules, so that they are applied before the devices are named e.g. enp2s0.

root@beaglebone:~# cat /etc/udev/rules.d/70-wifi-powersave.rules
ACTION=="add", SUBSYSTEM=="net", KERNEL=="wlan*", RUN+="/usr/sbin/iw dev %k set power_save off"

The iw dev wlan0 set power_save off command disables a WiFi feature called power save mode. I believe it is part of the 802.11 standard, but support varies by driver and chipset. It gets negotiated between the client device and the access point on authentication. If it is enabled, the access point may buffer multiple small packets before sending them to the client and the client spends less time either transmitting or receiving. If I run the command ping -t 192.168.0.17 from my windows machine with power_save off, the time is very stable at 1 to 2ms. If I get a connection with power_save on, the time varies greatly with most times reported over 100ms.

My home network has plenty of nearby networks to conflict with.

root@beaglebone:~# iw wlan0 scan | grep SSID | sort
        SSID: Aman-Guest
        SSID: Aman2.4G
        SSID: Aman5G
        SSID: Angela's Wi-Fi Network
        SSID: Battlestar Galactica
        SSID: Battlestar Galactica
        SSID: CenturyLink0705
        SSID: Cyberia
        SSID: Dagobah
        SSID: Derek's Wi-Fi Network
        SSID: HP-Print-60-LaserJet 100
        SSID: HSE-1305(a) .media
        SSID: Jaggernet
        SSID: Jaggernett
        SSID: Joergstrasse
        SSID: Joergstrasse5
        SSID: Joshernet
        SSID: MOTOROLA-06F23
        SSID: NCH1205
        SSID: NCH515
        SSID: NCH611
        SSID: NETGEAR84
        SSID: Paris
        SSID: PhishingNet
        SSID: Poop2 5GHz
        SSID: PoopTime
        SSID: SMC
        SSID: Se1301
        SSID: Seattle2GHz
        SSID: SusansWIFI
        SSID: WimsWorld
        SSID: WimsWorld-5G
        SSID: XVI
        SSID: bedford
        SSID: bedford
        SSID: go-seahawks
        SSID: goodtimes
        SSID: goodtimes-guest
        SSID: ladines
        SSID: maverick
        SSID: mridula_air
        SSID: shubaloo
        SSID: shubaloo-5g
        SSID: washington

One other change that I made was to disable the cpu-ondemand.timer service with the command:

systemctl disable cpu-ondemand.timer

I don’t know if that has affected my WiFi stability, but it has certainly made my overall system more stable. By default this service runs after the BBB has been running for ten minutes, and then puts the system clock into variable mode with the command cpufreq-set -g ondemand. I ran into problems with my machine changing it’s internal frequency on a regular basis. for my purposes, I chose to leave the CPU in it’s default state, running with the performance governor, which leaves it at 1000 MHz. run the command cpufreq-info to see what state the BBB is currently in, and what it’s possible to change it to.

My machine seems to be stable right now, as can be shown by nothing being added to the dmesg log since the initial boot, 19 and a half hours ago.

root@beaglebone:~# dmesg | tail -32 ; uptime
[    9.360135] usb0: eth_open
[    9.360359] IPv6: ADDRCONF(NETDEV_UP): usb0: link is not ready
[   10.281944] gs_open: ttyGS0 (dcaccc00,dcaa8600)
[   10.282105] gs_close: ttyGS0 (dcaccc00,dcaa8600) ...
[   10.282119] gs_close: ttyGS0 (dcaccc00,dcaa8600) done!
[   10.283944] gs_open: ttyGS0 (dcaccc00,dcd1f980)
[   11.637465] usb0: stop stats: rx/tx 0/0, errs 0/0
[   11.742846] ip_tables: (C) 2000-2006 Netfilter Core Team
[   12.058808] net eth0: initializing cpsw version 1.12 (0)
[   12.070772] net eth0: phy found : id is : 0x7c0f1
[   12.070810] libphy: PHY 4a101000.mdio:01 not found
[   12.075883] net eth0: phy 4a101000.mdio:01 not found on slave 1
[   12.133068] IPv6: ADDRCONF(NETDEV_UP): eth0: link is not ready
[   12.694713] IPv6: ADDRCONF(NETDEV_UP): wlan0: link is not ready
[   18.301568] wlan0: authenticate with 20:4e:7f:85:ce:5b
[   18.327171] wlan0: send auth to 20:4e:7f:85:ce:5b (try 1/3)
[   18.327734] wlan0: authenticated
[   18.336184] wlan0: associate with 20:4e:7f:85:ce:5b (try 1/3)
[   18.337359] wlan0: RX AssocResp from 20:4e:7f:85:ce:5b (capab=0x411 status=0 aid=2)
[   18.342420] wlan0: associated
[   18.342545] IPv6: ADDRCONF(NETDEV_CHANGE): wlan0: link becomes ready
[   18.342777] cfg80211: Calling CRDA for country: US
[   18.342940] cfg80211: Regulatory domain changed to country: US
[   18.342951] cfg80211:   (start_freq - end_freq @ bandwidth), (max_antenna_gain, max_eirp)
[   18.342962] cfg80211:   (2402000 KHz - 2472000 KHz @ 40000 KHz), (300 mBi, 2700 mBm)
[   18.342973] cfg80211:   (5170000 KHz - 5250000 KHz @ 40000 KHz), (300 mBi, 1700 mBm)
[   18.342983] cfg80211:   (5250000 KHz - 5330000 KHz @ 40000 KHz), (300 mBi, 2000 mBm)
[   18.342993] cfg80211:   (5490000 KHz - 5600000 KHz @ 40000 KHz), (300 mBi, 2000 mBm)
[   18.343003] cfg80211:   (5650000 KHz - 5710000 KHz @ 40000 KHz), (300 mBi, 2000 mBm)
[   18.343013] cfg80211:   (5735000 KHz - 5835000 KHz @ 40000 KHz), (300 mBi, 3000 mBm)
[   18.343022] cfg80211:   (57240000 KHz - 63720000 KHz @ 2160000 KHz), (N/A, 4000 mBm)
[   18.418237] wlan0: Limiting TX power to 23 (23 - 0) dBm as advertised by 20:4e:7f:85:ce:5b
 16:34:09 up 19:35,  1 user,  load average: 0.03, 0.07, 0.05

Interesting BeagleBoneBlack Power Solution

I’ve been working on a project that I want to make portable that requires powering both the BBB and a USB hub, so that enough power is supplied to the required USB peripherals. While looking for other items in Fry’s recently I came across a USB Barrel Jack Adapter. http://www.frys.com/product/7726838 At only $3 for a part with reasonable strain relief I was quite happy to give it a try.

BBB Powered by USB Hub

Barrel Jack draws power from hub to power the BeagleBone

Items plugged into my USB Hub:

  • Linksys AE1000 802.11n WiFi Adapter connected to my 5.8GHz network
  • Barrel Jack Adapter providing Power to BeagleBoneBlack
  • Logitech C920 WebCam

Because of the orientation of the ports on my hub and the fact that the AE1000 is wider than most USB devices I’m not able to plug four devices into this hub. The BBB starts and runs consistently when I apply power to the USB hub in this situation. This is a good situation for me because it appears that I just need to properly power the 2Amp/5Volts required by the hub, and it can provide enough juice for the BBB to operate.

iOS7 Flatness Information Density

I followed the crowd and upgraded my iPad to iOS7 last night. I had no problems running the upgrade.

I had my iPad connected to iTunes on my laptop, told iTunes I wanted to upgrade and it started downloading. I went off and watched a movie on my TV and ignored the entire process. The upgrade was over a gigabyte, so my DSL took over an hour for it to download it. I heard the device disconnect tones from windows at some point, noticed my iPad had the Apple logo displayed and a progress bar, but continued to let things happen unattended.

iOS7 Home Screen

iOS7 Home Screen

When my movie completed, I came back to the iPad, entered my unlock code, and confirmed the basic settings for the new OS, including confirming the WiFi network I wanted to use. No problems at all. I wish an iTunes software upgrade on my windows laptop would operate that smoothly.

The first thing I noticed was that some items had been pushed off my primary screen to a second screen. I think I had previously put FaceTime into my personal group “Social” and the upgrade brought it back to the top. Fixing that let me move the items from the second screen back to the primary screen.

The next thing I noticed was that personal groups now have multiple pages, and that each page can only hold 9 items. I believe the old system only allowed a personal group to hold 16 items. The new system doesn’t have that limit, but only displays 9 items at a time. I know that I’ve got fat fingers, and touch targets need relatively large spaces to make sure that the correct item is hit, but on my iPad, I want to find the icon, not have half of my screen used displaying the background instead of the icons I can chose from.

iOS7 subgroups only show 9 items at a time!

iOS7 subgroups only show 9 items at a time!

This got me thinking about the current trend towards flat interfaces, going away from isomorphic user interfaces.  I’ve been using a Windows Phone for several years, and am very familiar with the trend for flat interfaces. On the phone, with it’s small screen, I have found that I like the trend. In my desktop and laptop running Windows 8 I’ve been less pleased with the implementation and now seeing it on the iPad I have a similar negative reaction.

My problem with the flat interface on the larger screen is that less information is displayed on the screen at one time, with new information completely replacing the old information, even if only temporarily.

A simple example in the iPad notification system. In iOS6 a notification slides in from the top of the screen, covering approximately half the width of the screen, centered, and about a fingers width in height. To the left and right of the notification the running app is still visible. In iOS7 a block slides down from the top of the screen covering the entire width. It may also take up nearly twice as much vertical space as the old system. I don’t have an iOS6 iPad to run side by side comparisons.

This is even more apparent when you decide to look at the notification center. If you slide down the notification center from the top, it will slide down entirely covering your screen. If you have the Today Summary option turned off, only 7 items will fit on one screen without scrolling. The notification center completely obscures the running application even when there are no items to be displayed. If you’ve slid the notification center down from the top center and there is nothing to display, the entire screen is obscured and you still have to go to the very bottom of the screen to slide and dismiss the notification screen.

I’ve found that the flat interface feels like it’s giving me less information and wasting space even when a flat object takes exactly the same number of pixels as a textured object. I’ve got screen grabs of the Safari displaying the same web page in the old interface and the new interface. When I was in college I remember learning that when making flow charts it was better to use boxes with rounded corners and not submit drawings on engineering grid paper because the shapes themselves would cause some people to dislike your output before they even had time to process the content. I completely understand the efficiency gains of using hard corners in displaying objects, but find it interesting how much my pleasure at interacting with the objects is affected.

Safari in iOS6 displays filleting on the corners of the tabs, and the text has the appearance of engraving.

Safari in iOS6 displays filleting on the corners of the tabs, and the text has the appearance of engraving.

iOS7 Safari Ferry Weather Landscape

Safari in iOS7 displays vertical lines between the tabs, the text is flat, and the full URL is not displayed, only the host being visited.

A change to the interface of the photo app that I’m not sure if it’s because of the flat interface, or some other design decision. I now can’t seem to look at photos in full screen mode. Now, I’ve always got a bright white bar at the top and bottom displaying more information. I don’t want those constantly displayed! I want to see my photo and swipe left or right to get to the next photo! What’s even worse is that I can tell that the bar is obscuring portions of my image.  The bar is evidently displayed with slight transparency, and I can see the image visible through the bar. I have no idea how to turn this off. I’ve not been able to find a setting in the photos app, or in the settings section related to photos. In general, I’d rather have a black surround for the photos than the white surround that has now been chosen. I picked a black iPad instead of a white one for a similar reason.

Photos bars obscure portions of images!

Photos bars obscure portions of images!

My first “Maker Space” visits.

In the projects I’ve been working on, I’ve been wandering around looking for small electronics parts. I like visiting Fry’s Electronics when I know what I want, or at least have a good idea, but the closest one to me is 15 miles away through some of the worst traffic in the area.

A few weeks ago when I was looking in a small electronics store within easy walking distance of where I live, Metrix Create:Space was recommended for me to try. It was slightly farther away, but easily within driving or bus distance, and with operating hours from noon to midnight 7 days a week, easy to visit without worrying too much about traffic.

The first time I went in, I was looking for a small plug that would allow me to power a small USB hub from a 5 volt battery. I have the hub and it’s 110 Volt wall power adapter with a description that the center is the positive pin, so I had an example part of both sex to make sure I was getting what I wanted. There was a person behind the counter with the cash register on it when I walked in, so I asked her if they had the part I was looking for. I she indicated that she didn’t know, but that I was welcome to look around. I got the impression that she wasn’t very interested in helping me. The counter had a stack of basic task description flyers for the place, listing prices for basic workspace use, soldering station use, textile station use, 3D Printer use, CNC Router use, etc.. Looking at the list was interesting to me. In a confused and slightly flustered state, I tried to ask how the space worked and what was involved in doing anything there. I was met with a blank stare. As I was about to give up and leave, a second person came past and started talking to me about how the pricing structure worked, that I could just pay per hour, for various things that I wanted to do, and she showed me some of the different stations they have, including multiple types of 3D printers, the soldering station, the milling machine, and laser cutter/engraver. She indicated that they didn’t have many standard electronic parts as an off the shelf supplier, but might have what I was looking for in odds and ends drawers off to the side of the counter and I was welcome to look through them. I was somewhat intimidated by the entire place. It reminded me of a garage workshop with mismatched but functional furniture and too many things crammed into a small space, but a place that could be extremely comfortable when you knew how it worked. I didn’t spend much time looking for the specific part I was wanting, but decided I’d return when I had the part to at least use the soldering station. I also noticed one of the few retail style items they were selling was lengths of electro luminescent wire and a battery powered driver by SeattleLumin http://www.seattlelumin.com/. I thought that had some fun applications, but would purchase it sometime later.

A week later, after finding the plug I needed, I returned to try out the soldering space. Because I had decided that using the soldering station for the time to solder on a single connection seemed overkill, I decided to resolder the connections of the ESCs on my UAV to the power distribution board in a different orientation, so I could have the mounting platform extensions on the board facing fore and aft instead of the the sides.

The process worked simply. I gave them my name, and they made a note on a pad when I started working at the standard workshop. After disassembling the screwed in parts of my UAV at the regular table rate, I said I was ready to use the soldering station and another note of the time was made. I worked on my project on the soldering station for an hour and a half, largely due to my own soldering inexperience. I managed to get the job done, and then moved back to the simple workspace to complete the reassembly. Because I was frustrated with the effort I’d expended doing the work, I was happy to pay for the time and leave.

As I was in my car driving home through traffic I remembered that I’d wanted to by some EL wire for playing with the following evening, but I was not in a mood to turn back. Knowing that they’d be open until midnight, I decided I could revisit close to 11pm if I really wanted to.

Around 11pm, after having had dinner and relaxing for a few hours, I drove back up to Metrix to get the wire. There were several people standing around when I went in, some of which I’d recognized as having been there while I was working earlier in the day.

I asked how the lumiwire worked, could it be cut, what kind of batteries it used and some other details. I had one of the people helping me, demonstrating the various colors they had, its capabilities, and that it ran on AA batteries. I mentioned that I’d been in earlier in the day and was thinking of using the lumiwire as part of a nighttime landing pad for my UAV, demonstrating in an easily visible method how well the Return To Launch feature of the APM board was working even at night.

I ended up standing around for 15 or 20 minutes talking with the group there about what I’d been doing with the UAV project, how the EL wire actually worked, and what it’s applications might be, and a few other random tech subjects. The late night sharing of information really got me to understanding the value of having a space like this. I expect to go back again soon, when I need to put together something physical. I really want to try out laser etching, but haven’t yet figured out how to start, or what I want to do.

Quad Copter UAV Project

In late June I was finally convinced by a friend to get involved with his RC (Radio Controlled) helicopter hobby. He had been involved on and off since we were kids, while I’d always been much more interested in programming computers. Now the technology of the two hobbies has come together and he’s finally convinced me to get involved.

He recommended I buy four items, to have a good starter system. I bought the first item, and spent a month trying to figure things out, and then bought the rest of the items. I would have been better off to have simply spent all the money he suggested up front, as I didn’t like trying to fly the original UAV at all. If I had more experience flying RC airplanes my experience might have been different, but without the computer controlled stabilization, I really did not like the experience of flying the quadcopter at all.

The first item is described as Ready To Fly (RTF.) It is delivered with everything needed to fly except for 8 AA Batteries for the RC Transmitter.

  • Pre-assembled Four Arm Flight Frame
  • 4 Propellers
  • MWC Flight Control Board
  • ESC: Four 40A Brushless Hobbywing SkyWalker Electronic Speed Controllers
  • Motor: Four 2212 OutRunner Brushless 920KV Motors
  • 2.4ghz 6ch TX and RX
  • Battery 11.1v 2200mah 20C Li-Po
  • 3cell Balance Charger

There are also kits described as ARTF, which means Almost Ready to Fly.  The ARTF kits cost around $40 less and don’t include the RC receiver, transmitter (RX, TX), LiPo battery or battery charger. Since I didn’t already have a RX/TX pair, having the entire package together was certainly worth the $40 price difference. An average price for a similar LiPo battery alone would be $15.

A significant portion of time in researching what I wanted to do was spent in learning the terminology and acronyms. Actually having the device in my hands has helped me to understand what each part is and what it does.

AeroSky Radio Remote Control RC Quadcopter 4 Channel RTF

AeroSky Radio Remote Control RC Quadcopter 4 Channel RTF

The first thing is that the assembly instructions were extremely sparse. An experienced pilot might have no problems, but I certainly didn’t know what I was doing. The second thing is that while it ships with a Balanced Battery Charger, the only way of supplying power to the charger is a cable with a set of alligator clips.

There was no mention of what the extra wires in the bag were for. I later learned that it’s a special wire to be used for calibrating the four Electronic Speed Controllers (ESCs.) When I opened the box I had no idea what an ESC was, or that it might need calibration.

There are two bags of colored propellers. Each one is a set of two, that are designed to provide lift when rotating in opposite directions. The props need to be installed in a specific orientation for the device to have any stability. Forward Right rotates Counter Clockwise, Forward Left Clockwise, Rear Left Counter Clockwise, Rear Right Clockwise.  The propellers come with a set of nylon washers to fit various sized shafts. Using the washers that fit the tightest is important. Tightening the nuts and using so sort of lock tight solution is also recommended, especially because with the counter rotating shafts the nuts naturally want to spin free.

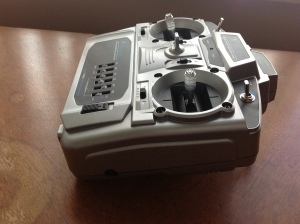
The radio controller transmitter that was shipped to me is branded Aerosky Digital Proportional Radio System 2.4 GHz FHSS Airplane System. The only unique labeling on the back was: Model MC6S and the FCC ID: ZMKMC4DFMCD6DF.

Aerosky Digital Proportional Radio System 2.4 GHz FHSS Airplane System

Aerosky Digital Proportional Radio System 2.4 GHz FHSS Airplane System

Aerosky Digital Proportional Radio System 2.4 GHz FHSS Airplane System

Aerosky Digital Proportional Radio System 2.4 GHz FHSS Airplane System

Aerosky Digital Proportional Radio System 2.4 GHz FHSS Airplane System

Aerosky Digital Proportional Radio System 2.4 GHz FHSS Airplane System

The rear view shows an audio style plug labeled D.S.C. and the side view has an unlabeled power plug. There is a small wire wrapped around the top handle of the transmitter. I have learned that this wire is a Bind Plug that can be used if my transmitter and receiver are not correctly talking with each other.  The receiver has a seventh set of pins that I’m supposed to plug this into and then I can bind the receiver to this transmitter. I’ve not found instructions for this radio anywhere on the web that confirm exactly what I’m supposed to do, but I’ve at least learned what binding is from other pages on the web.

The battery charger is labeled BC-3S10 2S/3S Balance Charger. It lists DC 9V-16V with center pin positive on the input side, and has two outputs, labeled 3S(11.1V) and 2S(7.4V). I had a AC Adapter from an old computer with a compatible plug and an output description 12-14V 5-4.28A that I was able to use to power the charger. When plugged in, the charger has two LEDs labeled Power and Charge. The Charge LED appears to blink until the battery is fully charged, and then goes solid.

When a battery is plugged into the UAV there are a series of beeps that happen. Three ascending tones, a pause, and then a pair of tones. The LEDs that are installed completely wrapping each of the arms also light up immediately when the power is supplied. I’ve learned that the tones are generated by the ESCs, so when you hear the tones, you are hearing four separate devices chirping at the same time, not related to signals from the central controller board. In this ready to fly package, the ESCs are presoldered to a control board, so there is no way to power them separately. If the boards need to be re calibrated for some reason, the beep tones may be different, and recognizing which arm is doing the beeping can be incredibly difficult.

My first day flying the unit in the RTF configuration I never felt comfortable flying, and I ran it into a stone retaining wall. When I ran it into the wall and crashed, I only chipped the end of a propeller blade slightly and broke the continuity on one of the LED strips, making one of the arms have an intermittent set of LED lights. The unit itself seems to be extremely durable.

After a couple weeks of not feeling happy with the stability and my flying ability I ordered the other items in the parts list. The flight control system I am using is produced in China by RCTimer and is a third party imitation of the ArduPilot Mega 2.5 Auto Pilot. The RCTimer package includes the GPS and Ground Control Telemetry Set that bring the 3DRobotics price up to $250. By buying the RCTimer package I had to buy the APM Power module and Case separately, and solder a huge number of header pins onto a circut board. I save $75 but I spent a huge amount of effort getting the soldering done. I’m not certain which way I’d go if I was doing it again.

I will generally refer to the flight control board as APM because that’s the term it is easiest to refer to it as when searching support forums. The original control board was referred to as MWC, which I’ve learned stands for Multi-Wii-Controller. It’s original heritage came from hobbyists reverse engineering the Nintendo Wii game console controller to learn how to use its accelerators.

The MWC that was the heart of the original RTF package was completely removed and the APM replaced it. The control wires from the RC RX unit connect to the APM inputs and the control wires to the ESCs connect to the outputs.  The APM has three other sets of external connections, Power, GPS, and Telemetry.

The two largest features of the APM that I currently use over the MWC are LOITER and RTL. I have switch 5 on my transmitter set to switch between Stabilized Flight Mode, and Loiter Mode. In Loiter mode, the UAV will will hold position in the air solidly.  I have switch 6 set to RTL, Return To Launch. RTL will rise to a set altitude, move to the GPS location the UAV took off, and then descend to the ground. Having these two features available has allowed me to learn how to manually fly the unit without constantly crashing.

I did not know anything about arming or disarming the ESCs when I started this process. Now it seems intuitive, but it was just one more thing I had to learn when I started. The motors will not turn under power until the ESCs have been armed. This is a protective feature because the blades will easily harm you if you are in their path. To arm the motors, you hold the throttle down to zero, and the stick to the right for a period of time. To disarm hold down and to the left for a period.  With my APM controller I need to hold it for ten seconds to arm, and 3 seconds to disarm, I don’t know if the APM is managing that detail or if it’s simply passing the signals directly to the individual ESCs.

Successful Evening Flying

Lesson About Power

For the past several months I’ve been learning to fly a quad copter UAV and trying to get First Person Video streaming over WiFi. This has meant that I’m spending a lot of time working with batteries and small electronics.

This last weekend I was lucky when a shorted wire was noticed before it caused significant damage.

Melted wire next to it's power supply

Melted wire next to it’s power supply

I was standing around talking when my friend asked what was smoking. I spun around to find the smoke coming from a box of cables and batteries. I flipped the wires out of the tailgate of my vehicle onto the ground. You can see the insulation is completely melted from the wire in the foreground.  I was extremely lucky that no further damage was caused.

The battery pack that caused this is a 4 cell pack producing 4.8 volts with a 2000 mAH capacity.  Each cell appears to be the same size as a AA battery. Nearby were several 3 cell LiPo batteries that produce 11.1 volts and have 2600 mAH capacity.  The LiPo batteries are a different form factor from the NiMH that I’m using.

Because I need to power both my BeagleBoard and the USB hub at close to 5 volts, I had soldered a plug for the hub into a wire I already had for powering the BeagleBoard. I wasn’t able to get the wire and its insulator to fit inside the strain relief, so for this weekend, I just left everything open, deciding that if things worked properly I could produce a better looking solution later.

A short was likely caused by a piece of bare metal from a prong on a wall plug resting against the plug where I’d neglected to use insulated heat shrink tubing. The rapid discharge of the battery obviously supplied more current than the wire was designed for, and the heat. If the heat from the first problem had melted the insulation on the larger and higher discharge LiPo batteries, my entire vehicle could have caught on fire. Perhaps actual fire could have happened with just this battery if I’d simply not noticed it for a longer period of time.

I am taking this as a reminder that even small low voltage batteries can create significant problems and should be handled with care, and for me it was lucky to learn on a small scale when I only lost the ability to run the wireless tests I wanted to run in the field that day, and not losing anything of significantly more value.